Written by:


Last Published:
12 August 2026
•

React Native and Redux are the pairing most teams reach for when an app outgrows local component state. This guide shows how to wire the two together, how to keep that state alive across restarts, and how to work out whether the pattern is worth adopting at all. Think of it this way: without a store, state gets handed down the component tree like a parcel passed along a corridor, each component holding it just to pass it on. Redux replaces the corridor with a stockroom. One room, one logbook, and any screen can read what it needs without troubling the neighbours.
There are two routes through this page. If you are building the thing, follow the walkthrough top to bottom. If you are a technical lead or founder deciding whether to adopt Redux at all, skip to the four-question state test and the FAQ. Either way the underlying question is commercial as much as technical: a predictable state layer trades a little upfront boilerplate for faster onboarding and lower change risk later, and the four-question test is how you tell whether that trade pays off.
This is a beginner's guide to Redux and Redux Toolkit in a React Native application, and it assumes you know the basics of React Native. New to those too? Start with our guide to React Native and Expo, or the official React Native docs, then come back.
We use an Android emulator throughout. It simulates an Android device on your computer, so you can test across devices and Android API levels without owning each handset physically. It gives you almost everything a real device does. Our React Native and Expo guide covers getting that environment set up.
To keep things concrete, we build a simple counter application as we go. It will look something like this:
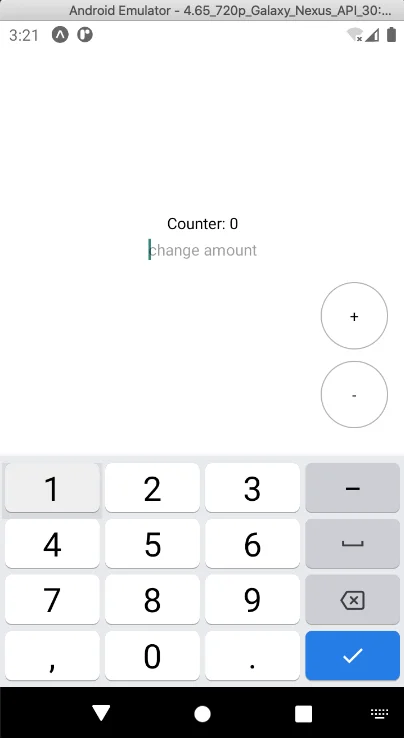
Here is the code of our SimpleCounter component:
// components/SimpleCounter.js
import React from 'react';
import { View, Text, Button, TextInput } from 'react-native';

const SimpleCounter = () => (
  <View>
    <Text>0</Text>
    <Button title="-" onPress={() => {}} />
    <Button title="+" onPress={() => {}} />
    <TextInput keyboardType="numeric" placeholder="Amount" />
    <Button title="Change by amount" onPress={() => {}} />
  </View>
);

export default SimpleCounter;
Right now that code is static. No state has been declared inside the component at all, and every example that follows builds on this one. Once your environment is ready, install the redux and react-redux libraries:
npm install redux react-reduxA note on the setup: we install the standalonereduxpackage here so you can see the mechanics from first principles. For a brand-new project, the package you would actually reach for is Redux Toolkit,npm install @reduxjs/toolkit react-redux, which is the Redux team's recommended default. We build up to it later in this guide, so you understand what it does on your behalf.
Redux is a JavaScript library for managing the state of your application. It gives you a centralised place called the store, where the state is saved and modified through actions and reducers. The stockroom, in other words, plus the logbook that says who changed what.
That single location lets you share state between screens and know exactly where and how it is being modified. It earns its place in growing applications: the ones nobody can hold in their head all at once, and which turn buggy for precisely that reason.
Redux manages application state through a combination of actions, reducers and the store. Learn how those three abstractions fit together and the rest is detail.
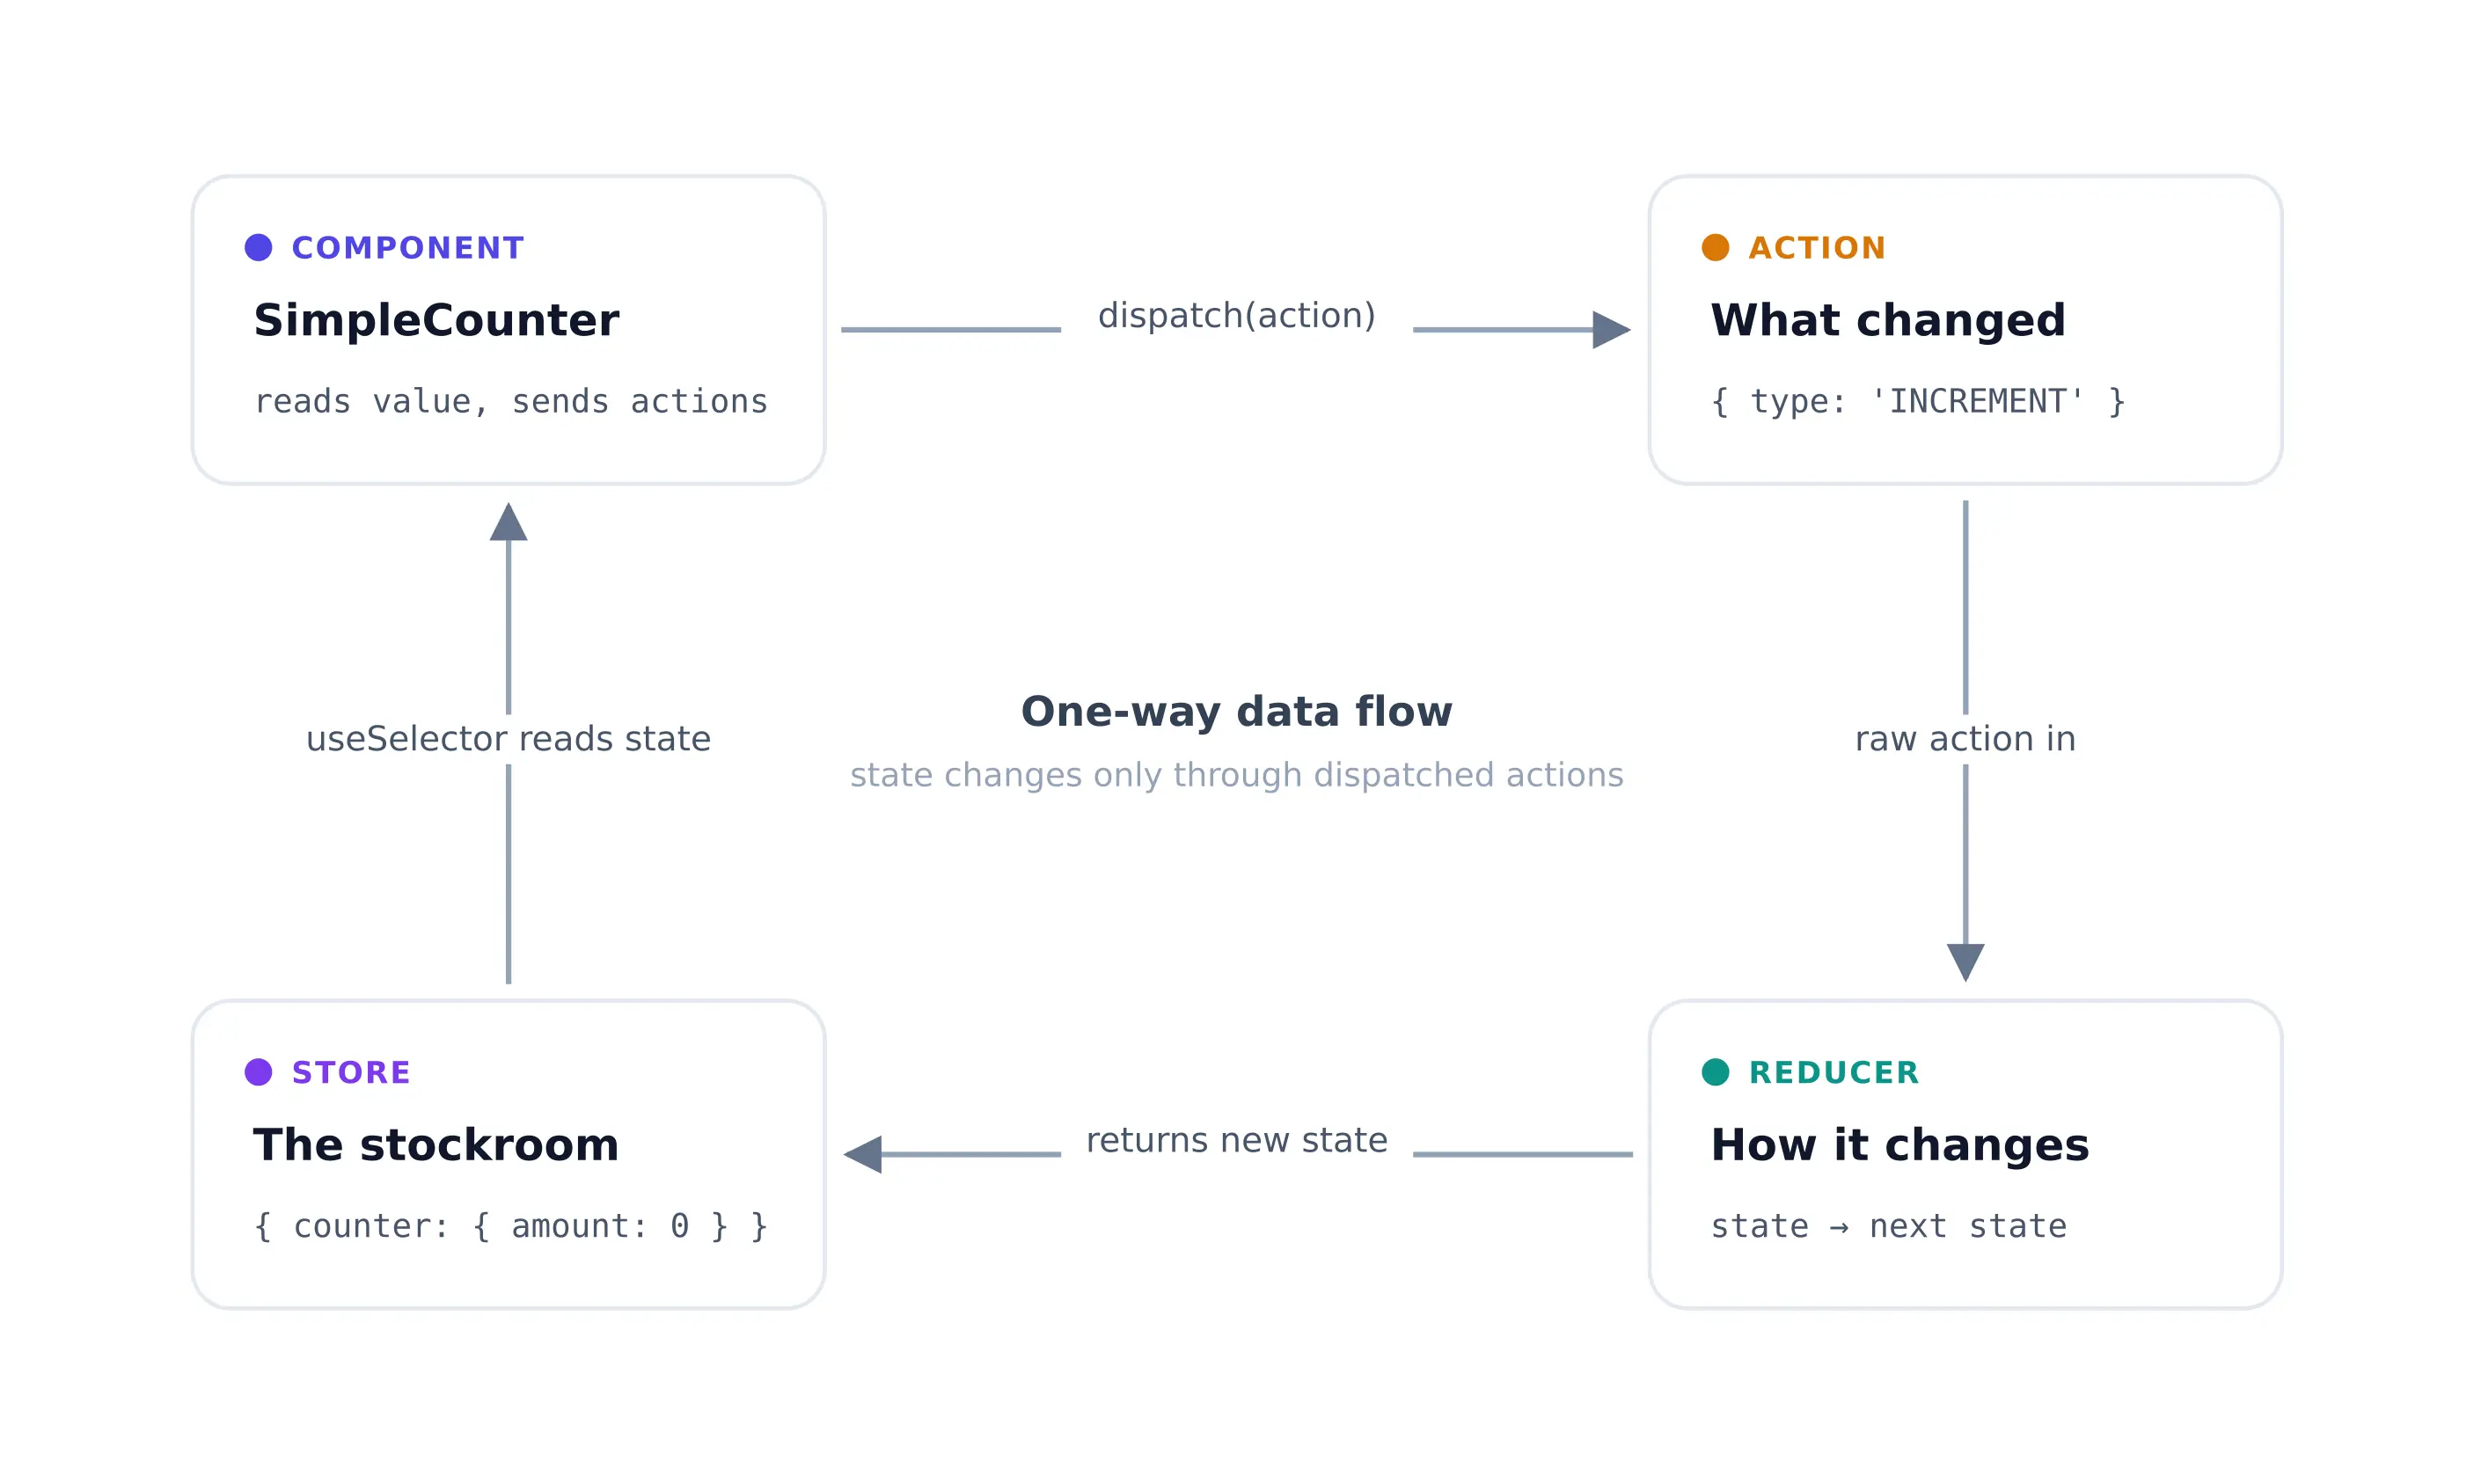
Application state is all the information your app uses or modifies. Centralise it, give it a predictable way of changing, and your screens stop disagreeing with each other about what is true.
This matters most in large single page applications, meaning apps that load once and then update the screen in place rather than fetching a new page for every interaction.
Actions and reducers modify the state together. Actions determine what is being modified and where. Reducers specify how. Looking at the counter layout from the beginning of this post, we need three actions: INCREMENT, DECREMENT, and CHANGE_BY_AMOUNT.
Actions are objects with a type and a payload attribute. The type is the action's identifier, and the payload carries everything the reducer needs in order to modify the state. Our first two actions only move the counter by 1, so they need a type and nothing else. The third one needs a payload to say by how much.
Declare your actions in a separate file called Actions:
// redux/Actions.js
export const INCREMENT = 'INCREMENT';
export const DECREMENT = 'DECREMENT';
export const CHANGE_BY_AMOUNT = 'CHANGE_BY_AMOUNT';

export const increment = () => ({ type: INCREMENT });
export const decrement = () => ({ type: DECREMENT });
export const changeByAmount = (amount) => ({
  type: CHANGE_BY_AMOUNT,
  payload: { amount },
});
Name actions after what happened, not after the handler you want to run. On our projects, action names that read like events survive refactors. Names that read like function calls get renamed the first time two screens need the same change. The Redux style guide makes the same case if you want the reasoning in full.
Next, the initial state. It lives in another file alongside the reducer:
// redux/Reducer.js
import { INCREMENT, DECREMENT, CHANGE_BY_AMOUNT } from './Actions';

const initialState = {
  counter: { amount: 0 },
};
The initial state holds an object named counter with an amount attribute, starting at 0. You will notice it is a constant rather than a variable, which looks odd for something described as state. We will come back to why.
Now the reducer, a function that takes the current state and the action as arguments and produces the new state:
// redux/Reducer.js (continued)
const counterReducer = (state = initialState, action) => {
  switch (action.type) {
    case INCREMENT:
      return { ...state, counter: { amount: state.counter.amount + 1 } };
    case DECREMENT:
      return { ...state, counter: { amount: state.counter.amount - 1 } };
    case CHANGE_BY_AMOUNT:
      return {
        ...state,
        counter: { amount: state.counter.amount + action.payload.amount },
      };
    default:
      return state;
  }
};

export default counterReducer;
We must never mutate the state inside a reducer. Why not? Because the reducer should not modify the state object directly, it should return a new object that becomes the new state. React's rendering engine compares the previous state object with the latest one to decide what to redraw.
Modify the state in place and React sees no change, so it holds a flawed notion of what your app currently is. The Redux documentation on immutable update patterns explains the mechanics in detail.
That is why we declared the initial state as a constant back there. It is the one object in the stockroom nobody is allowed to write on.
Next comes the store itself, the object where state is saved. Common practice is to create it and export it from its own file:
// redux/Store.js
import { createStore } from 'redux';
import counterReducer from './Reducer';

const store = createStore(counterReducer);

export default store;Heads-up:createStoreis officially deprecated as of Redux 5.0.0, so in your editor it will appear with a strikethrough. It still works and will keep working, so it is fine for learning the mechanics here, but the Redux team discourages using it, or the standalonereduxpackage, directly in new code. Its modern replacement is Redux Toolkit'sconfigureStore, which we move to later in this guide. If you see a deprecation warning at this step, that is expected.
We create the store with Redux's createStore() method, passing it the reducer function we defined earlier. With the store in place, we can invoke actions through the dispatch method, shown later in this guide, to modify the state.
Now we make the store available by passing it to the Provider component that wraps SimpleCounter. The Provider hands the store to that component and to everything inside it.
Provider comes from react-redux, the official binding library for React and React Native with Redux. Here is how it looks:
// App.js
import React from 'react';
import { Provider } from 'react-redux';
import store from './redux/Store';
import SimpleCounter from './components/SimpleCounter';

const App = () => (
  <Provider store={store}>
    <SimpleCounter />
  </Provider>
);

export default App;Now we connect our components to the store. In current React Native codebases you do that with two hooks from react-redux: useSelector reads a slice of the state, and useDispatch returns the dispatch method so the component can send actions back.
// components/SimpleCounter.js
import React, { useState } from 'react';
import { View, Text, Button, TextInput } from 'react-native';
import { useSelector, useDispatch } from 'react-redux';
import { increment, decrement, changeByAmount } from '../redux/Actions';

const SimpleCounter = () => {
  const amount = useSelector((state) => state.counter.amount);
  const dispatch = useDispatch();
  const [inputValue, setInputValue] = useState('0');

  return (
    <View>
      <Text>{amount}</Text>
      <Button title="-" onPress={() => dispatch(decrement())} />
      <Button title="+" onPress={() => dispatch(increment())} />
      <TextInput
        keyboardType="numeric"
        value={inputValue}
        onChangeText={setInputValue}
      />
      <Button
        title="Change by amount"
        onPress={() => dispatch(changeByAmount(Number(inputValue)))}
      />
    </View>
  );
};

export default SimpleCounter;
We only have access to the state object inside useSelector because SimpleCounter sits wrapped in the Provider. The selector receives the whole state and returns just the value the component needs, so the component re-renders when state.counter.amount changes and stays put when some unrelated corner of the store moves.
Keep your selectors narrow for that reason. The most common performance complaint we hear about Redux in React Native is a list that re-renders on every keystroke, and it is nearly always a selector returning a whole slice, or a freshly built object, where one value would have done.
Older codebases wire components up with the connect method and a mapStateToProps function instead. It merges the object returned from mapStateToProps into the component's props, so the same value arrives as this.props.amount:
// legacy pattern, still valid in existing codebases
const mapStateToProps = (state) => ({ amount: state.counter.amount });

export default connect(mapStateToProps)(SimpleCounter);
Both approaches talk to the same store. Hooks are the recommended pattern for new code and the one we use for the rest of this guide. Learn connect anyway, because you will meet it in any React Native project written before hooks landed.
So we have a centralised store, saving and modifying state predictably through actions and reducers. You may have noticed a gap, though. Close the app, reopen it, and the counter is back to zero.
That is because nothing is persisting the state. Every time the application starts, the reducer sets the counter back to its initial value.
Persistence matters whenever information has to outlive the session: login tokens, configuration settings, a draft the user was halfway through. In React Native you get it with the redux-persist library.
Redux Persist writes the store to local persistent storage and reads it back every time the app is re-opened or refreshed. We are on an Android emulator here, but it works just as happily on iOS. Start by installing it, along with AsyncStorage, the key-value store it writes to:
npm install redux-persist @react-native-async-storage/async-storageThen modify the Store.js file like so:
// redux/Store.js
import { createStore } from 'redux';
import { persistStore, persistReducer } from 'redux-persist';
import AsyncStorage from '@react-native-async-storage/async-storage';
import counterReducer from './Reducer';

const persistConfig = {
  key: 'root',
  storage: AsyncStorage,
};

const persistedReducer = persistReducer(persistConfig, counterReducer);

export const store = createStore(persistedReducer);
export const persistor = persistStore(store);
Import persistStore and persistReducer from redux-persist. Pass your reducer to persistReducer alongside the persistConfig object, and you get a persistedReducer back.
In persistConfig you declare that AsyncStorage will hold the store. AsyncStorage is React Native's key-value store, and it is unencrypted, so anything sensitive, and authentication tokens most of all, belongs in secure storage instead.

Finally, call persistStore to keep the store persisted. On a bigger project you may not want the entire state written to disk, and that is what the whitelist and blacklist options in persistConfig are for: choose the reducers worth persisting and leave the rest. The redux-persist README documents both.
Last, in App.js, import the persistor from Store.js and wrap SimpleCounter in PersistGate. It holds the UI back until the stored state has been retrieved and loaded into the store, so users never see the initial state flash before the real one arrives:
// App.js
import React from 'react';
import { Provider } from 'react-redux';
import { PersistGate } from 'redux-persist/integration/react';
import { store, persistor } from './redux/Store';
import SimpleCounter from './components/SimpleCounter';

const App = () => (
  <Provider store={store}>
    <PersistGate loading={null} persistor={persistor}>
      <SimpleCounter />
    </PersistGate>
  </Provider>
);

export default App;
Redux Toolkit is a library written by the Redux developers to help you create more efficient Redux logic. It is what the Redux team recommends for new projects, and it replaces most of the code above with a fraction of it.
It is also where the ecosystem has landed: Redux Toolkit is the Redux team's official recommendation for all new projects, and the large majority of React-Redux installs now pull it in alongside rather than hand-rolling Redux. We use it in production too. TrustPortal runs on Redux Toolkit to keep state predictable across a large enterprise application, which is exactly the payoff described here. Below is a tour of the functions that matter most.
createAction() for declaring actionsRedux Toolkit gives us a new way to create an action:
import { createAction } from '@reduxjs/toolkit';

export const increment = createAction('INCREMENT');
export const decrement = createAction('DECREMENT');
export const changeByAmount = createAction('CHANGE_BY_AMOUNT');
createAction takes the action type as an argument and returns an action creator function. Call that function, pass the payload, and you get the action object. You can also read the type back with the toString() method, as in increment.toString(). No more declaring action types as constants, which cuts the boilerplate considerably.
createReducer() for writing reducerscreateReducer simplifies the other half. Rather than a switch statement, you map each action to the function that handles it, which reads far more cleanly, and the action creators returned by createAction() can be passed straight to addCase(). Following the same reducer logic as before:
import { createReducer } from '@reduxjs/toolkit';
import { increment, decrement, changeByAmount } from './Actions';

const initialState = { counter: { amount: 0 } };

const counterReducer = createReducer(initialState, (builder) => {
  builder
    .addCase(increment, (state) => ({
      ...state,
      counter: { amount: state.counter.amount + 1 },
    }))
    .addCase(decrement, (state) => ({
      ...state,
      counter: { amount: state.counter.amount - 1 },
    }))
    .addCase(changeByAmount, (state, action) => ({
      ...state,
      counter: { amount: state.counter.amount + action.payload },
    }));
});
createReducer() also uses Immer, a library that lets you write code that looks like it mutates the state while it quietly produces a new copy underneath. Immer translates every mutating operation into the equivalent copy operation. Which means we can write the reducer like this:
const counterReducer = createReducer(initialState, (builder) => {
  builder
    .addCase(increment, (state) => {
      state.counter.amount += 1;
    })
    .addCase(decrement, (state) => {
      state.counter.amount -= 1;
    })
    .addCase(changeByAmount, (state, action) => {
      state.counter.amount += action.payload;
    });
});
Considerably shorter. Same behaviour.
createSlice() for actions and reducers togetherIn practice you rarely call createAction and createReducer separately. createSlice generates both from one definition: name the slice, give it an initial state and a set of reducer functions, and it hands back the reducer plus a matching action creator for each.
// redux/counterSlice.js
import { createSlice } from '@reduxjs/toolkit';

const counterSlice = createSlice({
  name: 'counter',
  initialState: { amount: 0 },
  reducers: {
    increment: (state) => {
      state.amount += 1;
    },
    decrement: (state) => {
      state.amount -= 1;
    },
    changeByAmount: (state, action) => {
      state.amount += action.payload;
    },
  },
});

export const { increment, decrement, changeByAmount } = counterSlice.actions;
export default counterSlice.reducer;
The whole Actions.js and Reducer.js pair from earlier collapses into that one file. Your components carry on using useSelector and useDispatch exactly as before.
configureStore() for creating the storeconfigureStore() wraps createStore() and sets up sensible defaults on the way, including the Redux DevTools connection and the default middleware, meaning the functions every action passes through on its way to the reducer. Because it is the modern successor to the now-deprecated createStore, it is what you should reach for in any new project.
It also takes a configuration object rather than a group of functions, so the reducer goes inside an object, under the reducer attribute:
import { configureStore } from '@reduxjs/toolkit';
import counterReducer from './counterSlice';

export const store = configureStore({
  reducer: { counter: counterReducer },
});Put redux-persist and Redux Toolkit in the same project and sooner or later you meet the error 'A non-serializable value was detected in an action'. The cause: configureStore() runs a serializable check, a development-time guard that warns when an action carries something Redux cannot safely store, such as a function or a Promise, and redux-persist needs to pass functions inside its own actions.
The fix is to keep the check on and exempt redux-persist's action types from it:
import { configureStore } from '@reduxjs/toolkit';
import {
  persistStore,
  persistReducer,
  FLUSH,
  REHYDRATE,
  PAUSE,
  PERSIST,
  PURGE,
  REGISTER,
} from 'redux-persist';
import AsyncStorage from '@react-native-async-storage/async-storage';
import counterReducer from './counterSlice';

const persistConfig = { key: 'root', storage: AsyncStorage };
const persistedReducer = persistReducer(persistConfig, counterReducer);

export const store = configureStore({
  reducer: persistedReducer,
  middleware: (getDefaultMiddleware) =>
    getDefaultMiddleware({
      serializableCheck: {
        ignoredActions: [FLUSH, REHYDRATE, PAUSE, PERSIST, PURGE, REGISTER],
      },
    }),
});

export const persistor = persistStore(store);
Note the difference between exempting those six action types and switching the check off altogether. Turn it off wholesale and you lose the warning for every genuinely non-serialisable value your own code drops into the store. The discussion and the solution both live in the redux-persist issue on the serializable check.
createAsyncThunk and RTK QueryOur counter is synchronous. Almost no real app is. In our experience, data fetching is the most common reason a React Native team adopts Redux in the first place: a request has a loading state, a success state and an error state, several screens want all three, and passing them around as props stops working fast.
Redux Toolkit offers two answers, and choosing between them is the practical decision most teams face.
createAsyncThunk wraps a promise and dispatches three actions on your behalf, one per phase, which you handle in extraReducers:
// redux/counterSlice.js
import { createSlice, createAsyncThunk } from '@reduxjs/toolkit';

export const fetchCounter = createAsyncThunk(
  'counter/fetch',
  async (userId) => {
    const response = await fetch(`https://api.example.com/counter/${userId}`);
    return response.json();
  },
);

const counterSlice = createSlice({
  name: 'counter',
  initialState: { amount: 0, status: 'idle', error: null },
  reducers: {
    increment: (state) => {
      state.amount += 1;
    },
  },
  extraReducers: (builder) => {
    builder
      .addCase(fetchCounter.pending, (state) => {
        state.status = 'loading';
      })
      .addCase(fetchCounter.fulfilled, (state, action) => {
        state.status = 'succeeded';
        state.amount = action.payload.amount;
      })
      .addCase(fetchCounter.rejected, (state, action) => {
        state.status = 'failed';
        state.error = action.error.message;
      });
  },
});
The component dispatches the thunk and reads the status:
const dispatch = useDispatch();
const { amount, status } = useSelector((state) => state.counter);

useEffect(() => {
  if (status === 'idle') dispatch(fetchCounter(userId));
}, [status, dispatch, userId]);
RTK Query goes further. Declare your endpoints and it generates the thunks, the reducers, the cache and a hook per endpoint, so all that loading and error handling disappears into the hook:
// redux/api.js
import { createApi, fetchBaseQuery } from '@reduxjs/toolkit/query/react';

export const api = createApi({
  reducerPath: 'api',
  baseQuery: fetchBaseQuery({ baseUrl: 'https://api.example.com/' }),
  endpoints: (builder) => ({
    getCounter: builder.query({ query: (userId) => `counter/${userId}` }),
  }),
});

export const { useGetCounterQuery } = api;

const { data, isLoading, error } = useGetCounterQuery(userId);
So which one? Use createAsyncThunk when the async work is a side effect you own, such as a login sequence or a background sync. Use RTK Query when you are caching server data, which on mobile is most of the time, because caching, refetching and invalidation are precisely the parts teams get wrong by hand. Mark Erikson, a Redux maintainer, explains why thunks are the default async tool in this write-up on RTK and async logic.
Our guide on how to handle async operations with Redux digs into thunks, sagas and the middleware alternatives. For a production example of the same loading, caching and refetching problem, Confinze pairs Redux with React Query in a fintech product, and reached an 85% retention rate off the back of that predictability.
Redux is not free. It adds files, indirection and a pattern every developer on the team has to learn. Before adopting it on a project, we run the four-question state test, and the answers usually settle the matter:
useState is the right tool.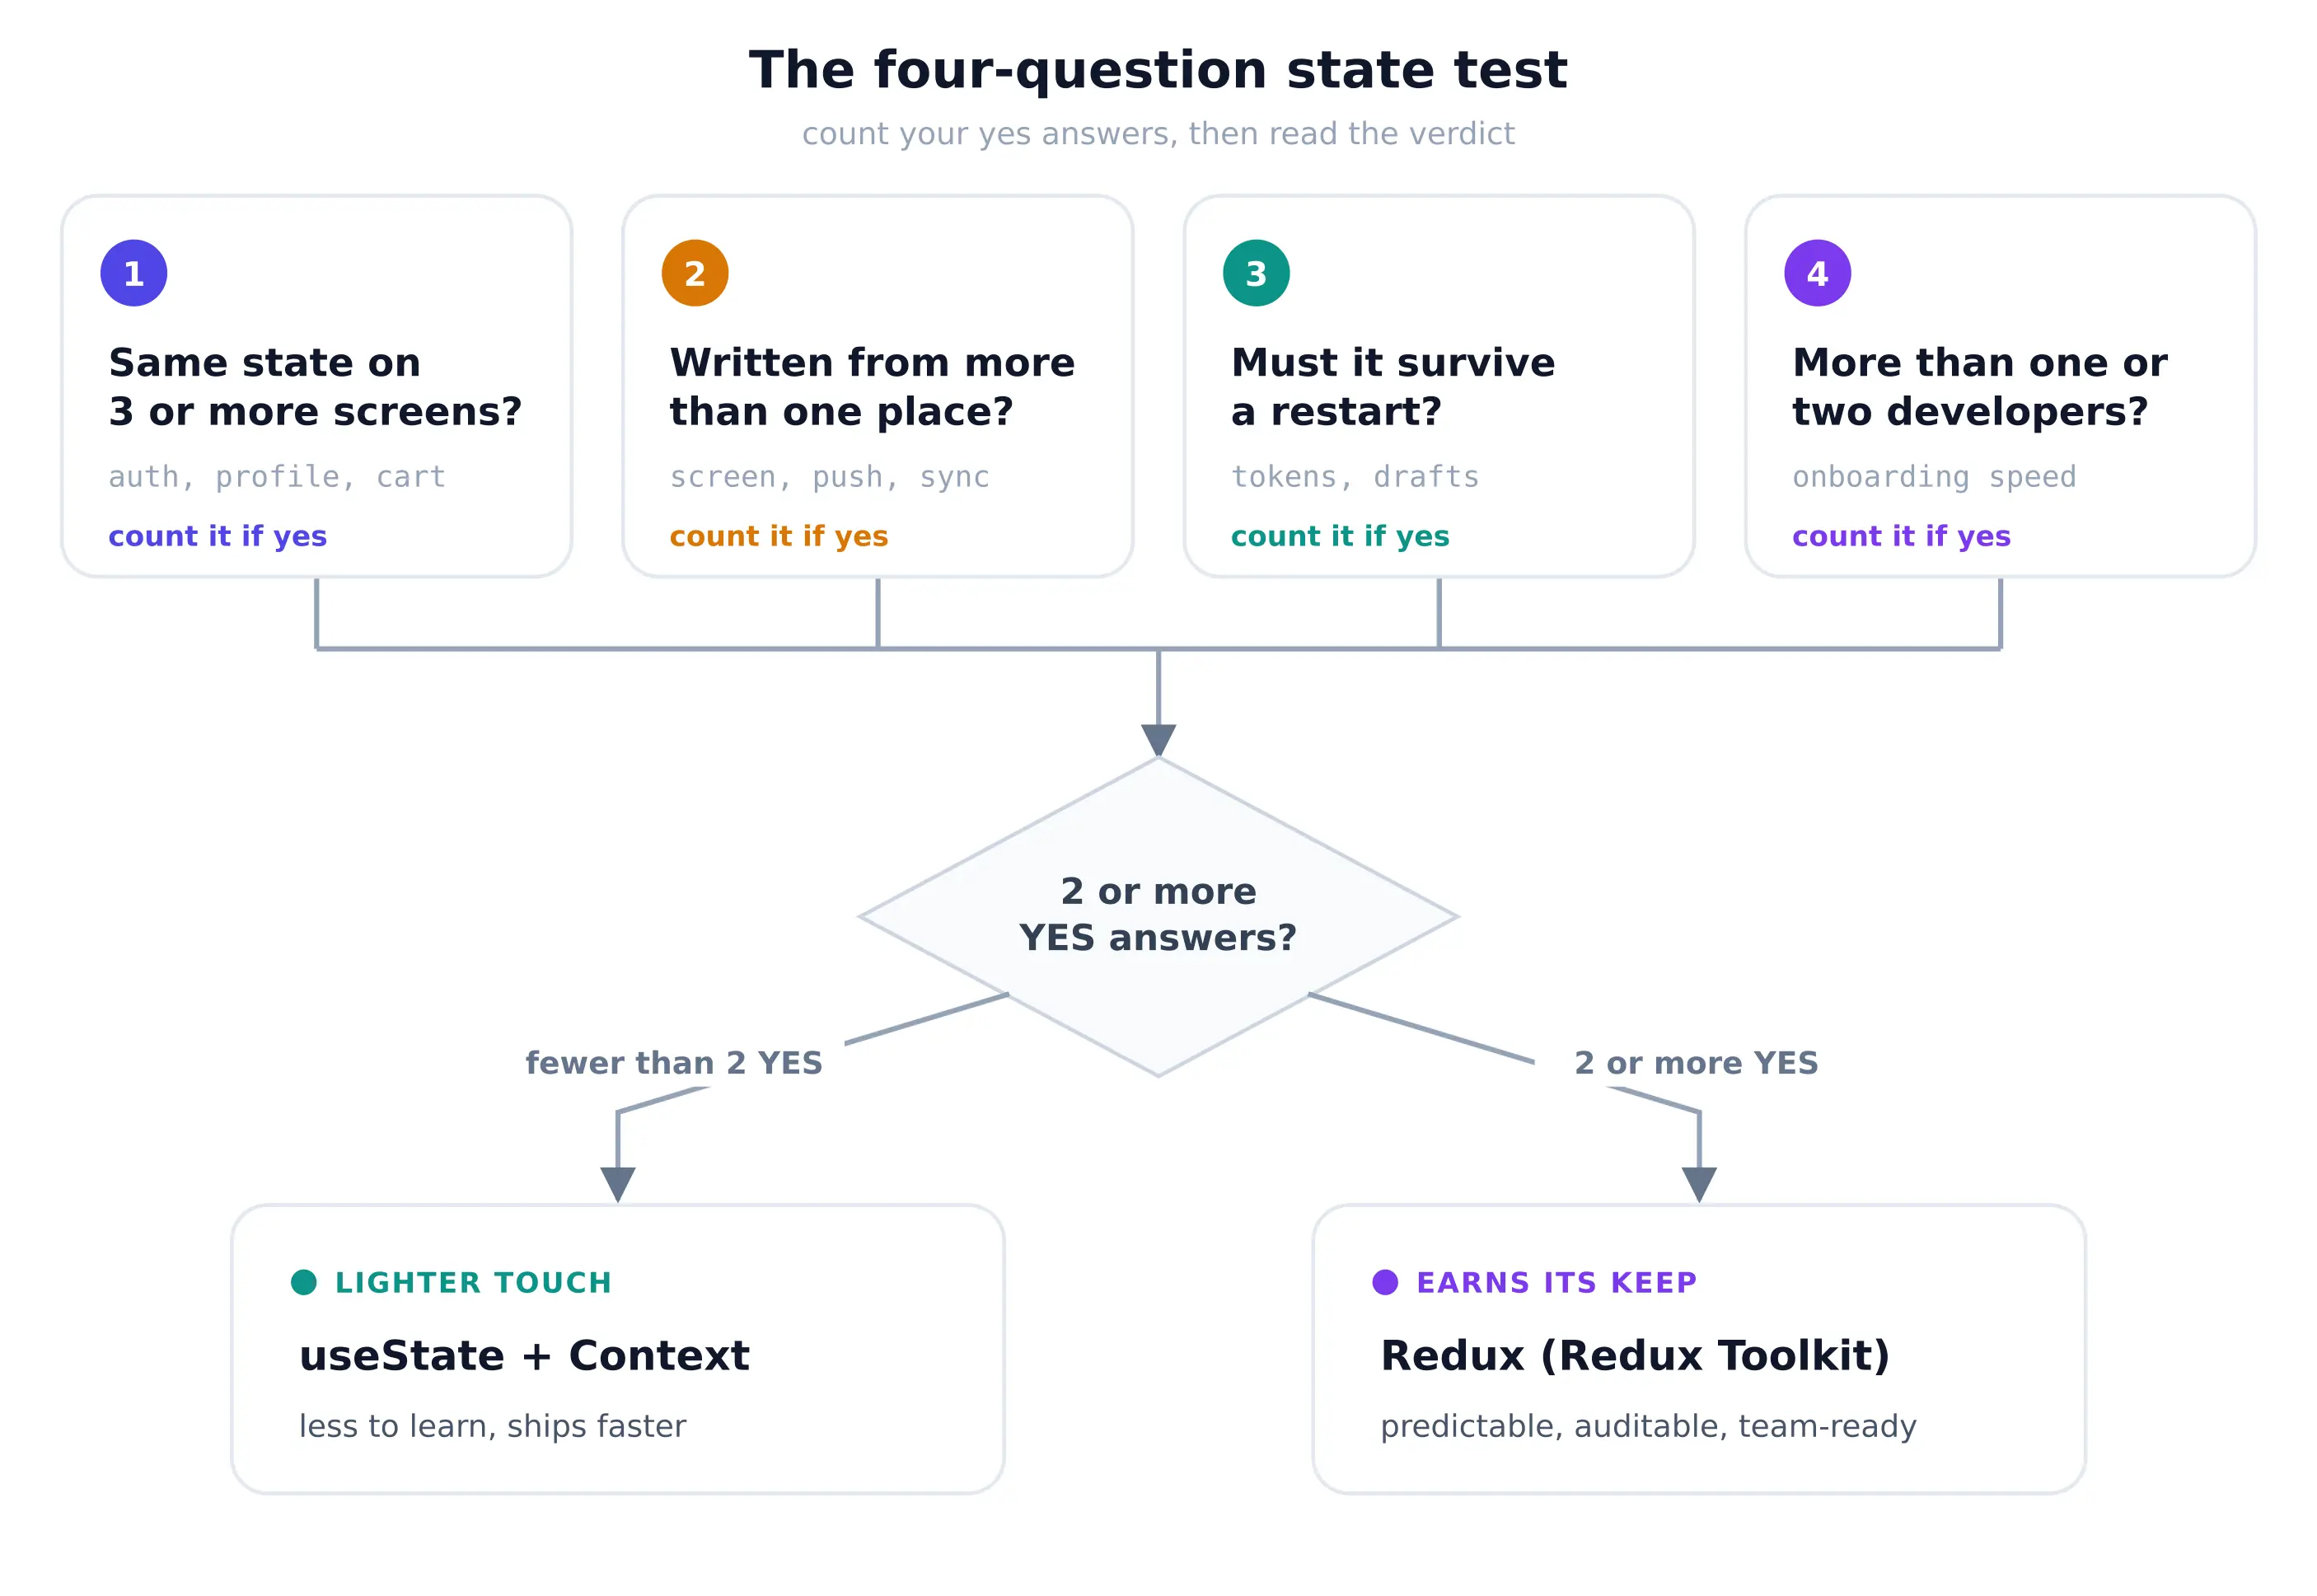
Two or more yes answers and Redux earns its keep. One or none, and React's own state plus Context will serve you better for less.
We have taken both routes. An internal tool with one screen and one developer stayed on useState and shipped faster for it. A delivery app with offline drafts, push updates and a rotating team was rewritten onto Redux Toolkit, precisely because state bugs kept arriving from three directions at once. On AppTweak, disciplined state management in a data-heavy dashboard was part of cutting loading time by 80%, which is the payoff this test is really weighing.
The commercial framing holds in both cases. You are trading a small, fixed setup cost against the cost of change later: how quickly a new developer becomes productive, how confidently you can ship a feature that touches shared data, and how much of your budget goes into reproducing defects rather than building. You can browse more of these outcomes in our case studies.
Not always. Since hooks and Context arrived, plenty of apps manage shared state without it. Redux still earns its place when state is read and written from several screens, has to survive a restart, or is maintained by a team rather than one developer. For a single screen with local state, useState is enough.
They solve different problems. Context passes a value down the tree and re-renders every consumer when it changes, which is fine for a theme or a locale. Redux Toolkit adds predictable updates, selective re-renders through selectors, devtools time-travel and a documented place for every state change. Choose Context for low-frequency, low-volume values and Redux Toolkit for state that changes often or arrives from several sources.
Install redux-persist and AsyncStorage, wrap your reducer with persistReducer and a persistConfig, create the persistor with persistStore, then wrap your app in PersistGate so the UI waits for the stored state. Use the whitelist and blacklist options to persist only the slices that need it, and keep tokens in secure storage rather than AsyncStorage, which is unencrypted.
It comes from configureStore's serializable check meeting redux-persist's own actions. Pass a middleware option to configureStore and add FLUSH, REHYDRATE, PAUSE, PERSIST, PURGE and REGISTER to ignoredActions. Do not disable the check entirely, or you lose the warning for genuinely non-serialisable values in your own code.
createAsyncThunk or RTK Query for API calls?RTK Query for server data you want cached, refetched and invalidated, which covers most mobile screens. createAsyncThunk for side effects you own end to end, such as a login flow or a sync job. Both ship inside Redux Toolkit, so the choice is per use case rather than per project.
Often, yes. If the app has a handful of screens, one developer and no state that outlives a session, the boilerplate costs more than it returns. Run the four-question state test above: fewer than two yes answers and you are better off with useState and Context.
createStore, or is Redux Toolkit enough?Redux Toolkit is enough, and it is what the Redux team recommends for new projects. The core createStore is now deprecated. configureStore, createSlice and Immer replace the manual action constants, switch-statement reducers and store wiring shown earlier in this guide. The longer form is still worth reading once, because it shows what the toolkit is doing on your behalf, and it is what you will find in older codebases.
Actions describe what happened, reducers decide how the state changes, and the store keeps the result where every screen can reach it. Redux Toolkit strips out most of the boilerplate, RTK Query handles the server data, redux-persist keeps state across restarts, and the four-question state test tells you whether any of it is worth adopting. Because Redux is view-agnostic, everything here transfers to a React web app too.
Weighing up state management for a mobile product, or inheriting an app where state has become the bottleneck? Our team works on this daily. Take a look at our development services, or tell us about your project and we will tell you honestly whether Redux is the right call for it.

Computer science student and ImaginaryCloud part-timer. Eager to learn new technologies and techniques. Tennis and piano player.
Alexandra Mendes is a Senior Growth Specialist at Imaginary Cloud with 3+ years of experience writing about software development, AI, and digital transformation. After completing a frontend development course, Alexandra picked up some hands-on coding skills and now works closely with technical teams. Passionate about how new technologies shape business and society, Alexandra enjoys turning complex topics into clear, helpful content for decision-makers.
People who read this post, also found these interesting: